1:2:3, Sourdough, Re, Mi
- Shaun Bauer
- Sep 14
- 6 min read

Updated: Oct 11
If you’ve wanted to bake sourdough at home or if you've already started and have been overwhelmed by complicated formulas or endless starter maintenance, you’re not alone. The good news is that sourdough doesn’t have to be complicated. With a simple 1:2:3 ratio (starter:flour:water), you can make consistent, flavorful bread without juggling multiple recipes or wasting tons of starter. Here, I'll walk you through my process for mixing, fermenting, shaping, and baking a reliable sourdough loaf, with some tips, recipes, and lessons learned along the way.


Less is More
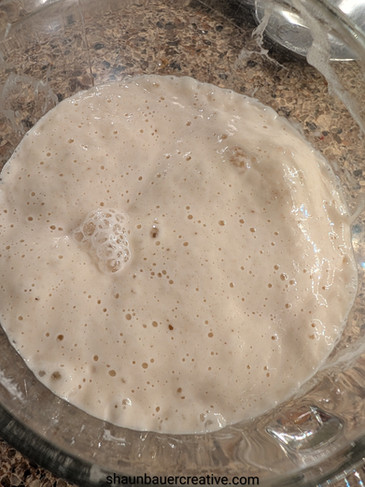
You don't need to be overrun with sourdough starter. A lower amount of starter to a higher amount of feed (flour and water) will take some time to develop to the stage where the starter can be used in a bread recipe. The (good) tradeoff is that you don't have to keep oodles and oodles of starter. I keep about 300 grams of starter in a quart Mason jar in the refrigerator, feed it about once per week, use the discard, and reserve a small amount to make the levain.
The 1:2:3 Ratio
This has really been the game changer for me, and it's so much easier to remember than any other recipe quantities/ratios. Using the less-is-more principle for making the levain, I have enough starter to go into one loaf, plus a bit extra for the next levain (175 or so grams of levain/starter, of which I use 167 grams in one loaf). That amount of starter with 332 grams of water and 500 grams of flour make the base recipe. I use 10 grams of salt and 12 grams of sugar. The sugar could be somewhat optional, yet I've found that for the American-conditioned palette, a bit of sweet helps balance the sour. There's also a good chance the sugar helps as a rising agent, so I'm keeping it in my recipe.
Use Your Discard
Have a few good go-to starter discard recipes in your rotation. Try my sourdough pancakes recipe or any number of recipes available on the web.
Pizza for the Win
I was given a small amount of a mature starter. Yet, after a few subpar loaves, I opted to stop worrying about making bread and turned to something that's way more forgiving. (You know the saying: "even when pizza is bad, it's still pretty good!") Decent pizza dough doesn't require the levels of precision that a big crusty boule does. Plus, using your starter and continuing to discard some and feed it, will allow it to acclimate to your environment and feeding schedule, as well as develop a healthy colony of organisms to make your loaves rise consistently. Note that my go-to pizza recipe uses a bubbly levain/starter like you would in sourdough bread, while there are some pizza recipes that use discard.
Who Kneads That?
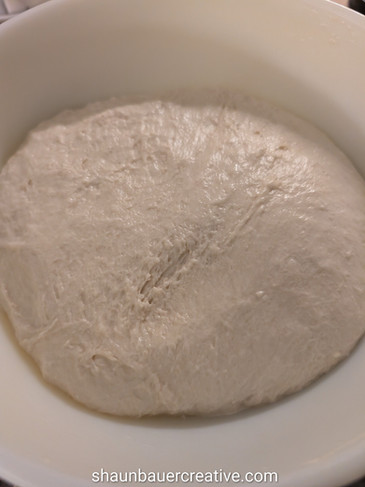
I struggled at the beginning of the journey with how much to knead or work the dough. Initially with the pizza recipe, I opted for a lot less kneading and had decent results. The boule requires a bit of working but not that much. I mix everything together at once until I get a shaggy dough but without any overt floury bits. I cover it for 30 minutes and let it rest. When I return to it, it easily shapes into more of a ball. I tend to prefer a one-handed method of turning the dough onto itself about 4-6 times in the bowl. I cover and let the dough rest with turns every 30 minutes until 2 and a half hours have gone by, meaning I have done about 5 repetitions of the turns. Then, bulk fermentation begins, and I leave it alone for a good 8-10 hours at room temperature.
Basic Recipe
Ingredients List
167 grams levain/starter
332 grams room temperature water
500 grams all purpose unbleached flour
10 grams table salt
12 grams granulated sugar
Equipment List
Reliable kitchen scale (with metric measurement)
Large mixing bowl
Flexible plastic bench scraper
Cloth-lined banneton
Lame or sharp knife
Clean kitchen towels
Dutch oven
Parchment paper
Instant-read thermometer
Forming the Dough
Plan to mix your starter in while it's at its peak. If you use a higher ratio of feed to starter, such as 1:32:32 or 1:64:64 (starter:flour;water), the levain will be at peak for a bit longer, so you'll have a larger window in which to mix the ingredients.


Measure the dry ingredients by mass using a kitchen scale and whisk together. This basic recipe doesn't use any autolyse method and I have had great results. Add the water and starter straight away.


Mix together the wet and dry ingredients until everything comes together into a shaggy dough and there are no huge bits of flour. You can do this step with your hands, but you don't have to begin kneading or working the mass of dough heavily at this point. Cover the dough with a damp kitchen towel and another plate or pot lid. Set your timer. I tend to set all the timers I will need for the resting/stretching-and-folding process at once (30, 60, 90, 120, 150 minutes).


Stretching and Folding
After 30 minutes of rest, you can begin working the dough. I use a stretch and fold with one hand, pulling the dough up and folding it down on top of itself, so the bottom becomes the top, tucking the portion I had in my hand underneath farther away from me. Do this about four to six times. Continue this every 30 minutes for two and a half hours (150 minutes) from when you started.


Bulk Fermentation
Once you have done your final stretch-and-fold set, lightly oil the lid or plate and cover (this time without the towel) and leave the dough at room temperature for eight to ten hours until it has roughly doubled in size. This is the bulk fermentation stage.
Toward the end of the bulk fermentation, lightly flour your work surface and get your tools ready. You'll need the bench scraper and your floured, cloth-lined banneton. You will want a bowl of water nearby and some extra flour for light dusting, but you should not need too much. You still want the dough to be sticky. It's a good idea to work with slightly wet hands/fingers at first, then add flour if you need it.
Shaping and Overnight Rise
Tip the dough out onto the work surface and use the bench scraper to gather it underneath itself, working the top of the dough to be smooth and round. When you've achieved the shape you desire (it won't be perfect!), lightly flour the top of the dough and then scoop under the dough with the bench scraper. The floured side will go down into the banneton and what was on the bottom will then be on top. Generously and evenly dust what is now the top with flour. Pull the sides back and dust a bit of flour there as well. The last thing you want is for the dough to stick to the cloth inside the banneton. Cover with a lightly floured kitchen towel and place in the refrigerator for the overnight rest.


Baking Your Loaf
The next day, with the dough still in the refrigerator, place your covered Dutch oven in the oven and preheat to 475° Fahrenheit. Allow the oven to preheat for an hour or so beyond the preheated warning that it will automatically give you. Cut a piece of parchment paper wide enough for the size of the banneton plus an inch or two on either side. Remove the banneton from the refrigerator. Turn the dough quickly and carefully onto the parchment paper. Use a lame or very sharp knife to cut into the dough. For your main cut, go about an inch or so deep into the dough. Add smaller designs as you wish.
Carefully remove the Dutch oven, uncover and lower the parchment-paper-cradled dough down into the Dutch oven. Cover and return to the oven. Bake for 20 minutes.


After 20 minutes of baking, carefully remove the cover of the Dutch oven and return to bake, uncovered, for another 10-20 minutes. The dough should reach 205° Fahrenheit on an instant-read thermometer stuck into the center of the loaf. Allow to cool slightly in the Dutch oven, before carefully using the parchment paper to transfer the loaf to a wire rack to cool.


Comments